
We have established that one of the key causes of website downtime is incorrectly configured DNS records. DNS or Domain Name System is the way to tell web browsers the actual server that your website is running on. Your website runs on server shared or dedicated in the cloud which has a public IP address. The DNS server comes to translate your website name such as sitemonki.com to corresponding server IP address running it, in my case 18.233.80.179.
A quick way to figure out the corresponding IP address of the server on which your website is running is via a simple ping command. You can simply open DOS on windows or terminal on Linux and Mac and type “ping mywebsite.com”. It’ll respond with the IP address such as “PING sitemonki.com (18.233.80.179) 56(84) bytes of data.” .
So this assumes already properly configured website. What if you just got a domain yesterday and have uploaded your website to a public server? Lets walk through the process step-by-step from scratch. I’ll be using sitemonki.com as an example, but feel free to replace this with your own domain.
Domain name registrars
All great ideas start with a name, isn’t it? A domain name is that name on the internet. When I thought of a way of automating website uptime monitoring, I had to come up with a great domain name for the idea. After several iterations, sitemonki.com stuck.
So I hit name.com to register sitemonki.com. Name.com is called a domain registrar. It’s a private commercial company with a license to register domain name. This license is issued by global internet watchdog ICANN which is “responsible for coordinating the maintenance and procedures of several databases related to the namespaces and numerical spaces of the Internet, ensuring the network’s stable and secure operation” ~ Wikipedia.
Domains range anywhere from $10 to as much as $200 from registrars. The price depends on the type of domain. Dot coms are usually the least expensive because they are the most used, so users benefit from economies of scale from registrars.
The next thing after registering a domain is to add DNS records. This is where DNS hosting comes in.
DNS Hosting provider
You can use your domain to host a website, receive emails among other things. For this to happen, you have to add corresponding DNS records to your domain. These records are stored by name servers managed by yourself (oh yeah, you can run your own) or by hosted by third parties.
You most likely want to go with hosted managed name servers. Properly setting and configuring and maintaining name servers is no easy task. There are several Free and Paid-for DNS hosting providers you can check out. But it’s likely that your registrar already offers DNS hosting. Name.com for instance does offer DNS hosting. However, I choose to look elsewhere. Digital Ocean has pretty descent free DNS manager which they offer along with their VPS(Virtual Private Severs) which I also use.
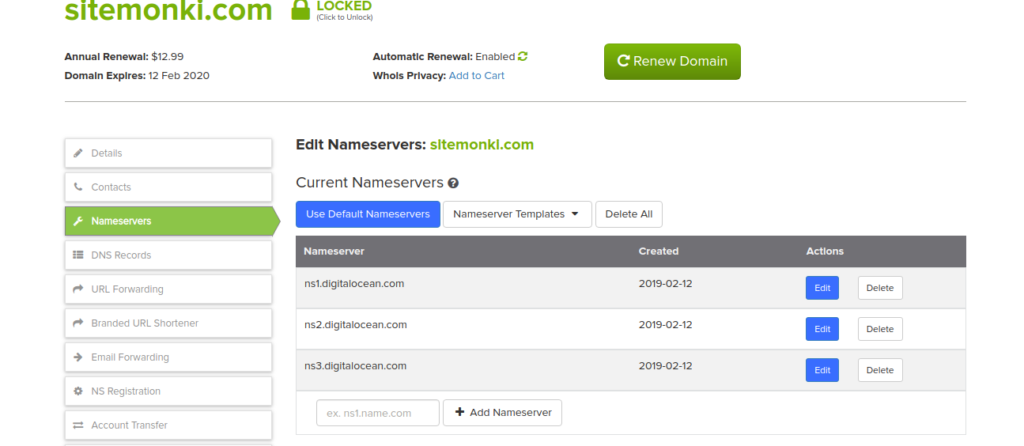
If you don’t use your registrar’s name servers, you have to specify at least 2 name servers such as ns1.digitalocean.com, ns2.digitalocean.com where you’ll host or add your domain’s DNS records. If you don’t do this, your domain will not resolve and therefore your website will never be accessible.
DNS Records
Now that you have specified name servers for your domain, you have to add corresponding DNS records. As you already know, sitemonki.com’s name servers are hosted by digitalocean.com even though my registrar is name.com. Now you have to login to your DNS hosting platform and add DNS records. Your provider must have a web dashboard where you can add these records easily.
There are several DNS record types some of which include;
- A (Host address)
- AAAA (IPv6 host address)
- ALIAS (Auto resolved alias)
- CNAME (Canonical name for an alias)
- MX (Mail eXchange)
- NS (Name Server)
- PTR (Pointer)
- SOA (Start Of Authority)
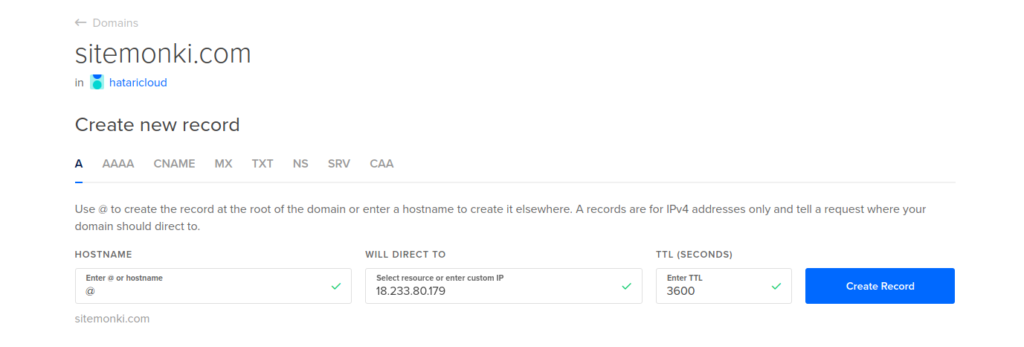
Since we are interested in hosting a website such as sitemonki.com, we are interested in the A record since it translates human friendly domain names such as “sitemonki.com” into IP-addresses such as 18.233.80.179.
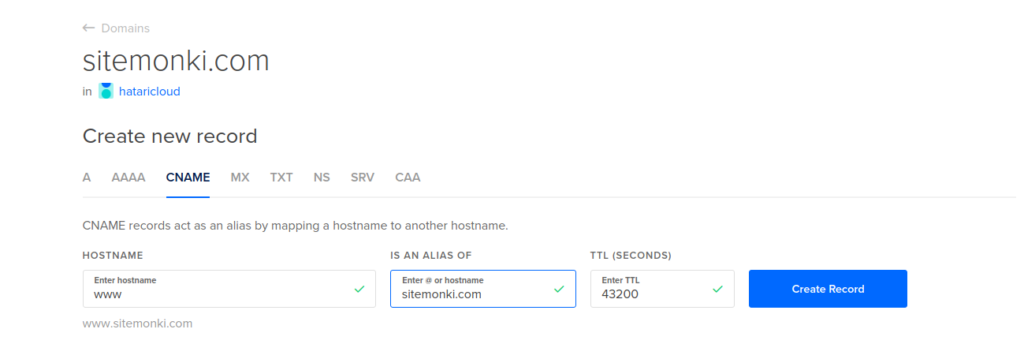
Along with the A record, you should optionally add a CNAME record. The CNAME record act as an alias or alternative name by mapping a hostname to another hostname. Your visitors will most likely prefix www to your domain name such as www.sitemonki.com instead of just sitemonki.com. So we should always add www.sitemonki.com as an alternative name of sitemonki.com using the CNAME record like so;
That’s pretty much it. Our final DNS records should look something like this;
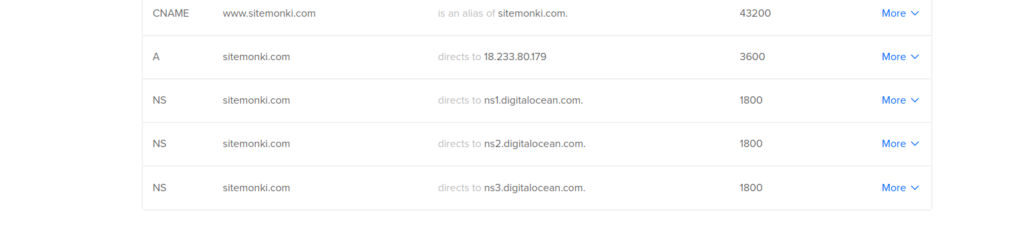
Notice we have NS record which we didn’t explicitly add. NS records identify the DNS servers or rather name servers responsible (authoritative) for a zone (domain name). Since we are using digitalocean as the name server for our domain, digitalocean auto fills that for us.
Web server
With DNS records correctly added, the rest of the configurations are specific to the application you are running. At the heart of hosting web applications are web servers. They accept and respond to queries from your users. There are several ways of setting up web servers depending on the application you are hosting. Content Management Systems such as WordPress are easy. The most common web servers are Nginx and Apache. I tend to prefer Nginx but it’s really upto you to see which one best suits your usecase.
You can read more on the documentation if you are interested in Nginx, but here’s an example of how to setup a domain with Nginx.
http {
  index index.html;

  server {
    server_name www.sitemonki.com;
    access_log logs/sitemonki.access.log main;

    root /var/www/sitemonki.com/htdocs;
  }

  server {
    server_name www.domain2.com;
    access_log  logs/domain2.access.log main;

    root /var/www/domain2.com/htdocs;
  }
}
So in summary, start with purchasing a domain from a registrar. Then choose a DNS hosting provider which can still be the registrar or someone else. Then add DNS records specific to your usecase, in the case of website the A and CNAME records. Then finally configure your web server to host your website or application.
After you are done, start monitoring your domain name. If you are domain name expires without your knowledge, your doomed. Your website will go off and you’ll have to fight back to regain your domain from people who might have already taken it. Luckily Site Monki offers domain name monitoring so you don’t lose your domain. So sign up today for Free.