Content Delivery Networks (CDNs) are an essential tool for website owners looking to improve website performance and security. A CDN works by caching your website’s content on servers located around the world, reducing the distance and time it takes for users to access your website. This results in faster page load times, improved user experience, and higher search engine rankings.
In this guide, we will show you how to add your website to Cloudflare CDN, one of the most popular and reliable CDN providers available. I will be adding sitemonki.com/blog which is the website you’re currently reading as an example website. This should help speed up this very site. Alright, let’s get into it.
Sign up for a Cloudflare account
To add your website to Cloudflare, you first need to sign up for a Cloudflare account. It’s totally free for starters, but there are paid plans for some features. So go to https://www.cloudflare.com/ and click on the “Sign Up” button in the top right corner. Follow the instructions to create an account. I already have an account with Cloudflare since I have several other sites I run the CDN on.
Add your website to Cloudflare
The next step is to add your website to Cloudflare. From the dashboard, click on “Add a Site” button.

Then enter your website URL.

You’ll then be prompted to choose a plan. Paid plans start from as low as $20/month in which case you get enhanced Web Application Firewall capabilities, Lossless Image optimization, Cache analytics, Enhanced bot mitigation, 20 Page rules, Ticket support, and more. For starters, select the Free Plan. It’s still quite as good. You get DNS hosting, Unmetered DDoS protection, a universal SSL certificate, 3-page rules, and of course a global CDN.

I have run a website attracting 1 million hits per month on the free plan, so it’s absolutely great. But if you want advanced features, the $20/month plan is still a steal.
Cloudflare will start to scan your site for DNS records to import automatically into your Cloudflare configuration. Ideally, Cloudflare will look for A, CNAME, and MX records. But it will also scan for AAAA, TXT, SPF, and other important DNS records. Essentially, Cloudflare will start managing the DNS records of your domain name.
You can decide how Cloudflare manages your domain’s DNS records. You have two options;
- Proxied. In this case, all traffic will pass through Cloudflare. Choose this option for A, AAAA, and CNAME records. This will allow Cloudflare to handle web requests from users before they are passed on to your web hosting company or server.
- DNS resolution only. This option will enable traffic bypass by Cloudflare. Client requests will directly hit your server without first going through Cloudflare. Select this option for MX records, staging, or development sub-domains of your website, and so forth.

Click on Continue. Cloudflare will automatically detect your current name servers according to WHOIS information.
Name servers act as a directory service that translates domain names into IP (Internet Protocol) addresses that computers use to communicate with each other. When you type a website’s URL into your web browser, the name servers are responsible for finding the corresponding IP address and returning it to your browser, which then uses it to connect to the website’s server. Name servers are typically provided by your web hosting provider or domain registrar.

My Name servers are hosted by my name registrar which is name.com. So, I’ll have to log in to my name.com and change the name servers from name.com nameservers (for instance ns1djs.name.com) to Cloudflare’s name servers (e.g darwin.ns.cloudflare.com).
If name.com is your registrar, to change the name servers, go to my My Domains, and click on the domain name you wish to connect to Cloudflare. Under domain details, click on Manage Namservers. Now you can delete the existing name servers one by one or delete all. You can then add Cloudflare name servers from “Nameserver templates” or add them manually.

When done, click on Save Changes. When you click back, you should now see cloudflare’s name servers under “Nameservers” section.
You can check if your domain’s nameservers have changed from the previous ones to Cloudflare’s using any of the DNS lookup tools I listed here. I like using Google Admin Toolbox Dig app.

Please take note that DNS record changes take time, sometimes up to 24 hours for the changes to fully propagate across the internet.
After you’ve changed the Nameservers to Cloudflare, click on “Done, check nameservers”.
Now, you can configure your domain further to improve security, optimize performance, and get the most from your account. For now, just click on “Finish later”. If your website is not immediately active on Cloudflare, that’s totally normal.
I got the message “sitemonki.com is not yet active on Cloudflare” even after I made the name server changes and I was presented with instructions of how to change my name servers.

Registrars can take 24 hours to process nameserver updates. You will receive an email when your site is active on Cloudflare.
For now, you can make a few tweaks to improve on your website security and performance on Cloudflare. Just click on Review settings.
Start by turning on Automatic HTTPS rewrites. This will help fix mixed content issues by changing “http” to “https” for all resources or links on your website that can be served with HTTPS. Then Turn on Brotli which helps speed up page load times for your visitor’s HTTPS traffic by applying Brotli compression.

If everything checks out, you should see a message that reads “Great news! Cloudflare is now protecting your site”. Now your website’s usage data will be showed in the dashboard once it’s available.

Verify Cloudflare integration
After completing the setup process, it’s important to verify that your website is properly integrated with Cloudflare.
The first step is making a DNS lookup to confirm that your website’s domain name servers are pointing to Cloudflare Name servers.
The second step is inspecting the HTTP response headers to your website. You specifically want to look out for the server value under the response headers. If the value is Cloudflare, then you can be sure that web requests are now proxied through Cloudflare. If it says “Nginx” or “Apache” or another value, then it means, your server is still directly answering all web requests.
You can use your browser’s developer tools to inspect HTTP headers or you can use online tools such as websniffer.com. I prefer using KeyCDN’s HTTP Header Checker tool. Just enter your website URL and click on Check. Lookout for the Server section and confirm if it says Cloudlfare.

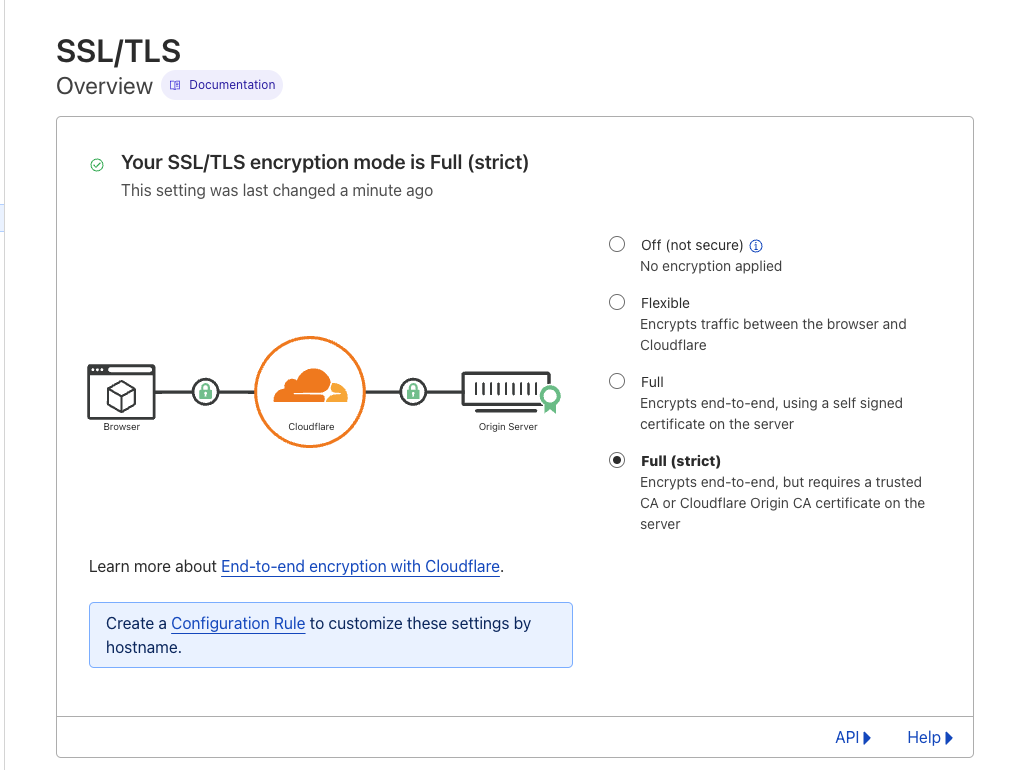
One more thing. If you find yourself getting “Too many redirects” from your browser as it did to me, then you might want to look at your SSL/TLS encryption modes settings on Cloudflare. After reading the documentation, I had to set mine to Full(Strict) because has set up Nginx on my origin server to redirect all http traffic to https. This was causing a loop. To avoid this, I had to tell Clouflare to connect to my server via https instead of unencrypted http connection.

After updating your DNS records, you can configure Cloudflare settings to optimize your website’s performance and security. Cloudflare provides a wide range of settings, including caching, SSL, firewall, and DNS management. You can choose the settings that best suit your needs and adjust them as necessary.
